Quick Guide: How to Change Skateboard Bearings
Knowing how to change skateboard bearings is a fundamental skill for any skateboarder. Over time, skateboard bearings can wear out due to exposure to dirt, moisture, and constant friction. Worn-out bearings can cause wheels to spin slower, impacting both your speed and control on the board. In this guide, we’ll walk you through the process of changing your skateboard bearings step-by-step. Whether you’re new to skateboarding or have been riding for years, learning to maintain and replace bearings will enhance your ride’s performance. Changing bearings isn’t as daunting as it seems. With a few simple tools and some basic knowledge, you can remove old bearings and install new ones in no time. This DIY task not only saves money but also helps keep your board in top shape for longer. Let’s dive into the process and get your skateboard rolling smoothly again.

Why Changing Skateboard Bearings is Important
Skateboard bearings play a crucial role in the overall performance of your skateboard. These small components allow the wheels to rotate freely, minimizing friction and enabling a smooth, fast ride. Over time, dirt, moisture, and wear can cause bearings to degrade, which negatively impacts the board’s performance. If your wheels start making noise, feel rough when spinning, or don’t rotate as freely as they used to, it’s likely time to replace the bearings. Regularly changing your bearings ensures that your skateboard maintains its speed and responsiveness. By replacing worn-out bearings, you’ll reduce friction, which helps prolong the life of both the wheels and the bearings themselves. New bearings also make your ride more enjoyable, as you’ll notice an immediate improvement in how smoothly your board rolls. Maintaining your bearings is an essential part of skateboard upkeep, ensuring safety and longevity in your ride.
What Tools Do You Need to Change Skateboard Bearings?
Before you get started with changing your bearings, it’s important to gather the right tools. The basic tools you’ll need include a skate tool or a wrench to remove the wheels, a bearing puller (though a flathead screwdriver can work in a pinch), and a rag or towel for cleaning. If your bearings are particularly dirty, you may also want to have some bearing lubricant or cleaner on hand. Having the right tools makes the process easier and prevents potential damage to your wheels or bearings. While it’s possible to change bearings without specialized tools, using the correct equipment will save you time and effort. If you skate frequently, investing in a skate tool is highly recommended, as it’s designed to fit skateboard hardware perfectly. Before you begin, make sure you have everything you need ready to go.
How to Remove Old Skateboard Bearings
Removing old bearings is the first crucial step to getting your skateboard running smoothly again. Follow these steps carefully to make the process easier and avoid any damage to your board.
Step 1: Remove the Wheels
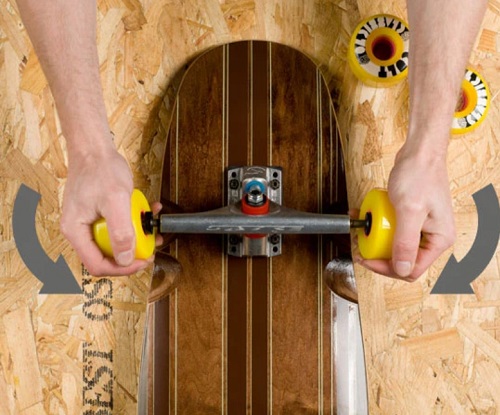
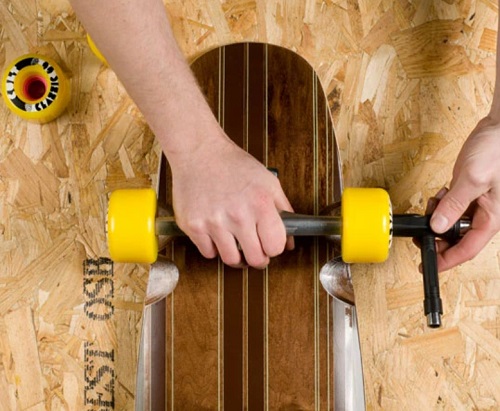
The first step in changing skateboard bearings is to remove the wheels. Using a skate tool or a wrench, loosen the nuts that secure the wheels to the axle. Turn the tool counterclockwise to unscrew the nuts, and carefully remove them along with any washers. Be sure to keep these parts in a safe place so you don’t lose them during the process. Once the nuts are removed, you can gently slide the wheels off the trucks. This step is straightforward, but it’s important to work carefully to avoid damaging the threads on the axle or losing small parts. Removing the wheels is a necessary step to gain access to the bearings inside. Once you’ve removed all four wheels, you’re ready to move on to the next step of removing the old bearings.

Step 2: Pry Out the Bearings
With the wheels off, it’s time to remove the old bearings. Using a bearing puller or flathead screwdriver, gently pry the bearings out of the wheels. Insert the tool under the edge of the bearing and apply steady pressure until the bearing pops out. Be patient and avoid using excessive force, as this could damage the wheels. You’ll need to repeat this process for both bearings in each wheel. If the bearings are stuck, you can apply a bit of lubricant to loosen them up. Some wheels have tight tolerances, making it a bit tricky to remove the bearings. Once the bearings are out, inspect them for signs of damage or wear. If they’re dirty or rusty, replacing them with new ones will make a noticeable difference in performance.
Step 3: Clean the Bearings and Wheel
After removing the old bearings, take a moment to clean the wheels and bearing seats. Dirt, grime, and debris can build up inside the wheel, which can affect how well the new bearings perform. Use a rag or towel to wipe out the inside of the wheel, making sure to remove any visible dirt. If you plan on reusing the old bearings, clean them thoroughly using a specialized bearing cleaner or rubbing alcohol. Cleaning your wheels and bearings before installation is essential for maximizing their lifespan. Dirt trapped inside the wheels can cause friction, leading to premature wear. By ensuring both the wheels and bearings are clean, you’ll help keep your skateboard rolling smoothly for longer.
How to Install New Skateboard Bearings
Now that you’ve removed the old bearings and cleaned the wheels, it’s time to install the new bearings. Let’s take a look at the steps involved in installing them properly.
Step 1: Insert the New Bearings
Once your wheels are clean, it’s time to insert the new bearings. Start by placing one bearing onto the wheel hub and gently pressing it into place. You can use your hands to apply pressure or use a skate tool or block of wood to press the bearing in evenly. The bearing should sit flush with the edge of the wheel. Repeat the process for the second bearing on the opposite side of the wheel. It’s important to ensure the bearings are properly seated. If they’re crooked or not fully inserted, your wheels won’t spin smoothly. Once the bearings are securely in place, move on to installing them in the remaining wheels. Proper installation ensures a smooth, frictionless ride.
Step 2: Reattach the Wheels
With the new bearings installed, it’s time to reattach the wheels to the skateboard trucks. Align the wheel on the axle and place the washers and nuts back on the axle. Using your skate tool or wrench, tighten the nuts until the wheels are securely attached, but make sure not to overtighten. The wheels should spin freely without excessive play. Reattaching the wheels is a straightforward step, but it’s important to check the tightness of the nuts. If they’re too loose, the wheels will wobble; too tight, and the wheels won’t spin properly. Finding the right balance is key to ensuring your skateboard rides smoothly with the new bearings.
Step 3: Test Your Board
Once the wheels are reattached, it’s time to test your skateboard. Spin each wheel to ensure it rotates smoothly and without any resistance. If the wheels don’t spin freely, you may need to loosen the nuts slightly. Take your skateboard for a short ride to check how it feels. If everything is properly installed, you should notice a smoother, faster ride right away. Testing your board is an essential final step to ensure the new bearings are working correctly. A quick ride around your neighborhood or local skatepark will confirm that everything is in order. If any issues arise, such as wobbling or noise, double-check the bearings and wheel installation.
What to Do If Bearings Are Stuck?
If you encounter bearings that are stuck and won’t come out easily, don’t panic. First, apply a small amount of lubricant or bearing cleaner to the stuck bearing and let it sit for a few minutes. This will help loosen any dirt or debris that may be causing the bearing to stick. After applying the lubricant, try prying the bearing out again using a bearing puller or screwdriver. In some cases, a gentle tap with a mallet can help loosen the bearing from the wheel. Be careful not to hit the bearing too hard, as this could damage the wheel or bearing itself. Patience and persistence are key when dealing with stuck bearings.
How Often Should You Change Your Skateboard Bearings?
The frequency of changing skateboard bearings depends on several factors, including how often you skate and the conditions in which you ride. If you skate daily or in wet, dirty, or rough environments, your bearings will wear out faster. In these cases, you should replace them every 3 to 6 months. Casual skaters who ride in clean, dry conditions may only need to change their bearings once a year. Regular maintenance can extend the life of your bearings. Cleaning and lubricating your bearings every few months will help them last longer and perform better. Always keep an eye on your bearings’ condition, and if you notice signs of wear or noise, it’s time to replace them.
Conclusion
Knowing how to change skateboard bearings is a valuable skill that every skateboarder should master. By following the steps outlined in this guide, you can easily remove old bearings, clean your wheels, and install new bearings to keep your board rolling smoothly. Regularly maintaining your bearings ensures that your skateboard performs at its best, offering a smoother, faster, and more enjoyable ride.
Whether you’re an experienced skater or a beginner, learning to change bearings is an essential part of skateboard maintenance. Taking the time to care for your board will not only improve your ride but also extend the lifespan of your wheels and bearings. Keep your board in top shape, and enjoy every session on smooth, fast-spinning wheels.
FAQs:
How long do skateboard bearings last?
Skateboard bearings typically last anywhere from 3 to 12 months, depending on how often you skate and the conditions you ride in. Regular cleaning and lubrication can help extend their lifespan.
Can you change skateboard bearings without tools?
It is possible to change bearings without specialized tools, but it’s much easier and safer to use a skate tool or bearing puller. Improvising with other household items can damage the bearings or wheels.
What are the signs of worn-out skateboard bearings?
Common signs of worn-out bearings include a rough ride, grinding noise when spinning the wheels, and difficulty getting the wheels to spin freely. If the bearings feel sticky, rusty, or visibly damaged, it’s time to replace them.
